Sunday, December 27, 2020

Temperature Quilt 2021!

Things are heating up on the Temperature Quilt Along Facebook Group! This means the New Year is almost here (and aren't we all glad for that this year?).

If you're new to this, I have a bunch of posts from last year to the right

 ------>>>

I did change the fabric planning sheet for 2021. You can sign up to get it over here.

I also updated the calendar where you can record your temperatures. You can find it under "files" in the Facebook Group and I'll send it in an email to subscribers in the next couple of days if you're not on Facebook.

My design for 2021 is appliqued hearts. It'll be much like my 2019 quilt but I am NOT hand appliqueing these.  They will definitely be fused and raw edge.


The planning sheet document includes templates for the little hearts should you decide to use this design.

Be sure to join the Facebook Group and/or follow Twiddletails on Instagram. I post over there more frequently.

Here's a pic of my 2019 quilt:

Happy New Year!!!!


Friday, October 2, 2020

New: Stitch Pink!

 I've fallen a little behind on the Leaves in the Forest quilt. My apologies for not giving this quilt-along the attention it deserved.  If you have any questions or trouble making the blocks, please contact me and I will gladly help.

On to new things! Have you heard of Stitch Pink? It's a free block-a-day from Moda Fabrics to commemorate Breast Cancer Awareness Month. Many shops, including Twiddletails, are hosting quilt-alongs, which include a daily free block pattern.

It started on the 1st but it's never too late to sign up.  Even if you sign up a little late, you will still get access to all the previous blocks and other freebies.

The fabric used in Moda's quilt is Grunge Basics. I have kits available but you can also use your own fabrics or another colorway if you prefer not to make a pink quilt.

I have included a color planning sheet to help you make the shift to other colors. I'm working on a different colorway for myself, so stay tuned.

Be sure to follow Twiddletails on Facebook and Instagram to be the first to know about new happenings at Twiddletails HQ.


Friday, September 4, 2020

Leaves in the Forest Quilt Along - Tips for Block 2

In Block 1, all the triangles were right triangles with a 90 degree corner and 2 equal sides, which made using strips for piecing very simple.

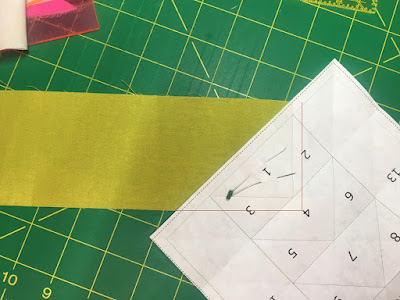
Block 2 is a little different. When there are triangles with one corner greater than 90 degrees (obtuse triangles), I have found that cutting a fabric rectangle is the most efficient.

So, for the colored fabrics, we will cut 3" x 7" rectangles.


The above photo shows the last colored section but they would all be sewn the same way.

The background triangles still have a 90 degree corner but the sides are different lengths. To piece these, we will be using different fabric strips for the odd and even sides. It may sound a little strange but will make sense once you do it.

Fold the pattern back along the line between section 7 and section 8 and trim the seam allowance roughly.

Lay a 4.5" fabric strip right side up and lay the block on top, right sides together. Remember to check that you have 1/4" of background fabric all around the triangle.


Sew, trim, and press the seam.

Repeat for section 9, this time using another strip with a straight edge or the other end of the same strip.

If you used the same strip, it will now look like this.

When you sew the next background sections, you will see that one end will "fit" but the other won't. 
Block 2a!
This is all very hard to explain in words so please let me know if anything doesn't make sense.


Wednesday, September 2, 2020

Leaves in the Forest Quilt Along - last tutorial

This will be the last tutorial post to explain how I use fabric strips for piecing.  When we get to some of the other blocks without 90 degree triangles, I will add bits of advice.

The next section is section 4. In the diagram it will be sewn using 30150-322 (russet orange).

1. Lay your 3" colored fabric strip right side up.

2. Fold the pattern along the line between sections 1, 2, and 3 and section 4 and lay it on top of the orange strip as below. The blue lines show the outline of section 4 and the red lines the edges of the orange strip. Note how there is at least 1/4" of orange fabric on all sides of section 4.

3. Carefully open the pattern back up and slide everything under the needle being careful that nothing shifts. It takes a bit of practice and if it helps you can certainly pin.

4. Sew the seam along the bottom of section 4. Sew only where the line is drawn.
5. Fold the pattern back again (it will look exactly like the first photo) and trim the seam to 1/4".
6. Open the pattern up.
7. Press the seam toward the orange triangle.
Now just keep going the same way and, before you know it, you'll have a whole block.
Note: Sew the last two seams (sections 13 & 14) all the way into the seam allowance and backstitch the ends.
Here's your block!
Trim to size. Measure 1/4" from the seam line.  I never trim along the cutting line because I may have cut the pattern out inaccurately.
Remove the papers. My advice is to start with the last seam you sewed and remove them in reverse order.
My five block 1's!


Tuesday, September 1, 2020

Leaves in the Forest Quilt Along - Continued

We ended the last post here:

Let's continue.

The next section is section 3, which will be in your background color.

We'll be using the 2.5" fabric strip we used for section 2.  It will now have a diagonal edge because of the way you trimmed section 2. Lay it right side up.

Fold the pattern along the seam line between section 1 and section 3. Place it on top of the fabric strip as below, aligning the diagonal edge on your block with the diagonal edge of the fabric.  Once again, be sure to leave enough seam allowance at the top and bottom. The blue lines are the edge of section 3.

Open the pattern back up and slide it under the sewing machine. Sew the seam between section 1 and section 3.


Fold the pattern along the seam line again and trim the seam allowance to 1/4".
When you open everything back up it should look like this:
Press as below.

At this point you know where section 3 ends, so you can trim it roughly. Fold the pattern as below and trim the seam a little larger than 1/4". I just trim it without a ruler.  We'll be doing exact trimming when we get there.

3 sections sewn! In the next post we'll sew section 4 and from there on we'll just repeat all the steps until the last seam.


Leaves in the Forest Quilt Along - Let's Sew!

We'll start with Block 1.

Foundation piecing is pretty much "sew by numbers", so we'll start with section 1 on your diagram and add section 2.

Reduce your stitch length. I think mine is about 14 stitches per inch.  This will make removing the paper in the end SO much easier.

1. Place a 3" fabric strip the color of section 1 RIGHT SIDE DOWN. This is the only time you will have your fabric this way.

2. Place the pattern with the printed side up on top of the fabric overlapping just enough to ensure that you have at least 1/4" on both straight sides. The red line shows where the fabric edges are under the pattern.

I like to pin the first fabric section to the pattern to avoid it shifting when I move everything over to the machine.

3. Cut the green (section 1) fabric along the diagonal a little outside the edge of the pattern.  You will trim everything at the end. (I forgot to take a photo of this part)

4. Fold the pattern along the folded line between section 1 and section 2. You should be able to see section 2 faintly through the paper or, if not, at least your fold lines. 

5. Lay a strip of background fabric (the color of section 2) RIGHT SIDE UP. I like to do this on the sewing machine so I don't have to move things and risk shifting the fabric. The background fabric strips will be very long in the beginning. If you find it too unwieldy you can cut them in half but don't cut them too short because using strips of fabric is what helps us not waste.

6. Place your pattern (with section 1 pinned in place), on top of the fabric as below. The section 1 (green) and section 2 (white) fabrics will be right sides together. You can remove the pins at this point but hold on to the fabric. Shifting is your enemy.
The blue lines are the seam lines of section 2. The red line is the edge of the background fabric strip.
Be sure to leave enough space all around for a seam allowance.
7. Carefully open the pattern back up and slide everything under the needle.  Be careful not to move the fabric or accidentally fold something under.
Sew along the seam line between section 1 and section 2. Do not sew beyond the line. You can backstitch on each end if you like.
Back on the cutting mat, fold the pattern back along the seam you just sewed.
Trim the seam allowance to 1/4" using your ruler or an add-a-quarter ruler.
Open the pattern back up and press.

Voila! You've sewn your first seam!

We're going to continue just like this, following the numbers and the pattern for fabric colors if you're using the fabric from the pattern.

If you have questions, contact me or, better yet, join the Facebook group because others may have the same question and everyone will be able to see my answer.

Monday, August 31, 2020

Leaves in the Forest - let's get started

This week we are making Block 1(5 blocks) and Block 2a (12 blocks).

My assumption with this QAL is that you already know the basics of foundation piecing.  If you don't, don't worry. I think this is pretty self-explanatory.

ALSO: I will be showing my method here.  It is not the be all and end all of foundation piecing. While the basics are the same, there are lots of different approaches out there.

I hate wasting fabric and this method uses much less fabric than the traditional way, which is a little more random.

Be sure to have your printed block diagrams and fabric at the ready.

The first thing we'll do is score all the diagrams along the seam lines. I use a sheet of card stock but anything about the weight of a greeting card or maybe a little heavier will do.

Lay your diagram face up and place the card along any seam line.  Fold the paper over the card, scoring along the whole seam line.

Repeat this for all the seam lines on the diagram.

When you're all done, your block diagram will look a little like an origami sculpture in the making.
Repeat this for all the block diagrams for Block 1 and Block 2.  It's a fun, mindless, thing to do while watching television if you have a lap tray.

Now we can get to sewing!
Since these posts are rather photo intensive, I'll be back in the next post.


Saturday, August 29, 2020

Leaves in the Forest Quilt Along - back on!

Soooo...I kind of feel like 2020 right now - you just don't know what may happen next. I've decided to do a scaled down edition of the quilt-along. My original plan involved carefully edited videos and photos but, given the circumstances, that was a little ambitious.


I will do weekly posts here on the blog with photos. I've been trying to figure out how we can all share our progress and ask questions if need be, and the only platform I could come up with is Facebook. I created a Facebook group: https://www.facebook.com/groups/twiddletailsquiltalongs 

You can also email me or leave a comment on each post and I'll try to answer your questions as best as I can.

Since this all starts in just a couple of days, it's time to get everything ready.

Print your patterns

Be sure to print the block patterns "actual" (100%) size. There is a little square on each page for double checking your size. This is VERY important!

For years I just used regular printer paper but I recently found 16lb paper which is quite a bit thinner. It's not easy to find so I'm not sure how much longer it will be available.


Cut your fabric

The pattern addendum has instructions for cutting your fabric into strips for piecing.

This really saves a lot of fabric and I will be showing how I do this for each block.

It's something between cutting actual templates which just adds too much prep time to my liking, and winging it which can waste A LOT of fabric but definitely provides more instant gratification.


Please note that (if you have half yards), the colored fabrics are to be cut along the 18" side of your fabric, not selvedge to selvedge. Background fabric is cut selvedge to selvedge.


You can either cut all your fabric strips ahead of time or one block at a time. I'm going to cut one block at a time but that's my personal preference.


Get organized

This is how I'm keeping it all organized:

1. Cut pages 8 and 9 of the addendum into the individual block images and place each in a separate ziploc bag.

2. Place the printed patterns for each block in the matching bag.

3. Place the cut fabric strips for each block in the applicable bag.

Lastly, a VERY handy tool when foundation piecing is an add-a-quarter ruler.  I am not a gadget person at all but this little tool changed my life. I have a couple so, if you're interested, send me an email and I can send you a PayPal invoice.  The pink ones are $7 including shipping and the yellow ones (which include a tapered edge for folding your paper), $8. This is my cost. (Domestic shipping only)


And that's it until August 31st, when we'll start sewing!


Wednesday, August 26, 2020

Leaves in the Forest Quilt Along - An Update

After much contemplation, I have realized that hosting a quilt along the way I want to at this point in time would be close to impossible.

I am currently sharing my office/sewing room with my hubby who is a wonderful office mate but it is really hard to sew consistently because his job involves a lot of conference calls.

I also want to provide videos every week because a picture is worth a thousand words.

I've been wracking my brain trying to find an alternate solution for sewing / video recording but have not come up with a solution that would not disrupt the rest of our routine.

Over and above that, we have multiple other unforeseen stressors in our lives right now. It never rains but it pours, right?

With all that being said, I am canceling or at least postponing this quilt along for now.

If you have bought the pattern and/or kit, I will always be available for questions.

I am posting the schedule I had planned for the quilt along below and am going to try and keep up with it myself.

Planned Quilt Along Schedule:

Week 1: Blocks 1 & 2a

Week 2: Blocks 2b & 3

Week 3: Blocks 4, 5a

Week 4: Blocks 5b, 6

Final week: Assemble quilt top

I'm SO sorry for any inconvenience this may have caused!


Wednesday, August 19, 2020

Leaves in the Forest Quilt Along - Introduction

I'm SO excited to be making this quilt and hope to have a bunch of people go through the process with me!


Schedule

now to 8/31: Collect your fabric and supplies and purchase the pattern.

8/31-10/4: Weekly block instructions will be posted on this blog.


How to follow along

I will be posting the instructions on this blog. There will possibly be instructional videos as well if I can get my act together.

I will announce when a new post is available both on Facebook and Instagram. You can also sign up below for weekly notifications.

We will be using the hashtag #leavesintheforestqal


The Pattern

The pattern we'll be using is my new Leaves in the Forest pattern.

All the blocks except the maple leaves are foundation (paper) pieced. The pattern does not include foundation piecing instructions but there are many tutorials online.

This is a good pattern for beginners because the segments are not too small.

The quilt finishes at 66" x 66".

(Get 50% OFF the pattern if you purchase the kit as well.)


Fabric Requirements

5 yards of  "background" fabric - I'm using Moda Grunge 30150-91 Vanilla.

1 Moda Grunge 12 Color Fabric Bundle - Fall/Autumn (0.5 yard size)

                                                    or

A total of 6 yards of fall colored fabrics of your choice

Foundation paper for printing or tracing the patterns


General Notes

The pattern includes an extra file with optional cutting instructions.  I will be using these as we go along.

You are welcome to use your own method but the fabric quantities are based on these instructions and you may need more fabric.

Let's go!

Tuesday, August 18, 2020

Well, that didn't quite work out...

 2020 was going to be the Year of Finishes. And then 2020 happened.

You would think that would be great for getting things done but with everyone making masks, orders exploded. A big thank you to everyone who supported and is still supporting my little business.

I have now developed a system to handle everything and things are much more organized.

I am still up to date on my Temperature Quilt (see details over to the right).

And I'm stocking fabric bundles as quickly as I can. It's never too late to start one of your own.  Or just grow your fabric collection...

I did finish my Bonnie Hunter Mystery Quilt top - "Frolic".
I also finished my Pecking Order quilt.  I have to admit I "cheated" and had it professionally quilted. (The pattern is from Missouri Star Quilt Company.)
I completed a couple of other things too, so perhaps the year hasn't been quite as unproductive as I thought.

Anyway, I'm about to start another project, which I wasn't "allowing" myself to do at the beginning of the year. Maybe you'd like to join me.
The quilt along will run from 8/31/20 to 10/4/20.
Sign up here for details, coupons, and weekly links to new instructions/videos. I will be posting an intro sometime this week with fabric requirements, etc.

That's it for right now.