Friday, September 4, 2020

Leaves in the Forest Quilt Along - Tips for Block 2

In Block 1, all the triangles were right triangles with a 90 degree corner and 2 equal sides, which made using strips for piecing very simple.

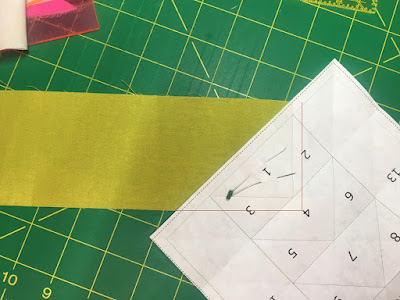
Block 2 is a little different. When there are triangles with one corner greater than 90 degrees (obtuse triangles), I have found that cutting a fabric rectangle is the most efficient.

So, for the colored fabrics, we will cut 3" x 7" rectangles.


The above photo shows the last colored section but they would all be sewn the same way.

The background triangles still have a 90 degree corner but the sides are different lengths. To piece these, we will be using different fabric strips for the odd and even sides. It may sound a little strange but will make sense once you do it.

Fold the pattern back along the line between section 7 and section 8 and trim the seam allowance roughly.

Lay a 4.5" fabric strip right side up and lay the block on top, right sides together. Remember to check that you have 1/4" of background fabric all around the triangle.


Sew, trim, and press the seam.

Repeat for section 9, this time using another strip with a straight edge or the other end of the same strip.

If you used the same strip, it will now look like this.

When you sew the next background sections, you will see that one end will "fit" but the other won't. 
Block 2a!
This is all very hard to explain in words so please let me know if anything doesn't make sense.


Wednesday, September 2, 2020

Leaves in the Forest Quilt Along - last tutorial

This will be the last tutorial post to explain how I use fabric strips for piecing.  When we get to some of the other blocks without 90 degree triangles, I will add bits of advice.

The next section is section 4. In the diagram it will be sewn using 30150-322 (russet orange).

1. Lay your 3" colored fabric strip right side up.

2. Fold the pattern along the line between sections 1, 2, and 3 and section 4 and lay it on top of the orange strip as below. The blue lines show the outline of section 4 and the red lines the edges of the orange strip. Note how there is at least 1/4" of orange fabric on all sides of section 4.

3. Carefully open the pattern back up and slide everything under the needle being careful that nothing shifts. It takes a bit of practice and if it helps you can certainly pin.

4. Sew the seam along the bottom of section 4. Sew only where the line is drawn.
5. Fold the pattern back again (it will look exactly like the first photo) and trim the seam to 1/4".
6. Open the pattern up.
7. Press the seam toward the orange triangle.
Now just keep going the same way and, before you know it, you'll have a whole block.
Note: Sew the last two seams (sections 13 & 14) all the way into the seam allowance and backstitch the ends.
Here's your block!
Trim to size. Measure 1/4" from the seam line.  I never trim along the cutting line because I may have cut the pattern out inaccurately.
Remove the papers. My advice is to start with the last seam you sewed and remove them in reverse order.
My five block 1's!


Tuesday, September 1, 2020

Leaves in the Forest Quilt Along - Continued

We ended the last post here:

Let's continue.

The next section is section 3, which will be in your background color.

We'll be using the 2.5" fabric strip we used for section 2.  It will now have a diagonal edge because of the way you trimmed section 2. Lay it right side up.

Fold the pattern along the seam line between section 1 and section 3. Place it on top of the fabric strip as below, aligning the diagonal edge on your block with the diagonal edge of the fabric.  Once again, be sure to leave enough seam allowance at the top and bottom. The blue lines are the edge of section 3.

Open the pattern back up and slide it under the sewing machine. Sew the seam between section 1 and section 3.


Fold the pattern along the seam line again and trim the seam allowance to 1/4".
When you open everything back up it should look like this:
Press as below.

At this point you know where section 3 ends, so you can trim it roughly. Fold the pattern as below and trim the seam a little larger than 1/4". I just trim it without a ruler.  We'll be doing exact trimming when we get there.

3 sections sewn! In the next post we'll sew section 4 and from there on we'll just repeat all the steps until the last seam.


Leaves in the Forest Quilt Along - Let's Sew!

We'll start with Block 1.

Foundation piecing is pretty much "sew by numbers", so we'll start with section 1 on your diagram and add section 2.

Reduce your stitch length. I think mine is about 14 stitches per inch.  This will make removing the paper in the end SO much easier.

1. Place a 3" fabric strip the color of section 1 RIGHT SIDE DOWN. This is the only time you will have your fabric this way.

2. Place the pattern with the printed side up on top of the fabric overlapping just enough to ensure that you have at least 1/4" on both straight sides. The red line shows where the fabric edges are under the pattern.

I like to pin the first fabric section to the pattern to avoid it shifting when I move everything over to the machine.

3. Cut the green (section 1) fabric along the diagonal a little outside the edge of the pattern.  You will trim everything at the end. (I forgot to take a photo of this part)

4. Fold the pattern along the folded line between section 1 and section 2. You should be able to see section 2 faintly through the paper or, if not, at least your fold lines. 

5. Lay a strip of background fabric (the color of section 2) RIGHT SIDE UP. I like to do this on the sewing machine so I don't have to move things and risk shifting the fabric. The background fabric strips will be very long in the beginning. If you find it too unwieldy you can cut them in half but don't cut them too short because using strips of fabric is what helps us not waste.

6. Place your pattern (with section 1 pinned in place), on top of the fabric as below. The section 1 (green) and section 2 (white) fabrics will be right sides together. You can remove the pins at this point but hold on to the fabric. Shifting is your enemy.
The blue lines are the seam lines of section 2. The red line is the edge of the background fabric strip.
Be sure to leave enough space all around for a seam allowance.
7. Carefully open the pattern back up and slide everything under the needle.  Be careful not to move the fabric or accidentally fold something under.
Sew along the seam line between section 1 and section 2. Do not sew beyond the line. You can backstitch on each end if you like.
Back on the cutting mat, fold the pattern back along the seam you just sewed.
Trim the seam allowance to 1/4" using your ruler or an add-a-quarter ruler.
Open the pattern back up and press.

Voila! You've sewn your first seam!

We're going to continue just like this, following the numbers and the pattern for fabric colors if you're using the fabric from the pattern.

If you have questions, contact me or, better yet, join the Facebook group because others may have the same question and everyone will be able to see my answer.